Deviljhoイビルジョー
Brute Wyvern ・ 恐暴竜
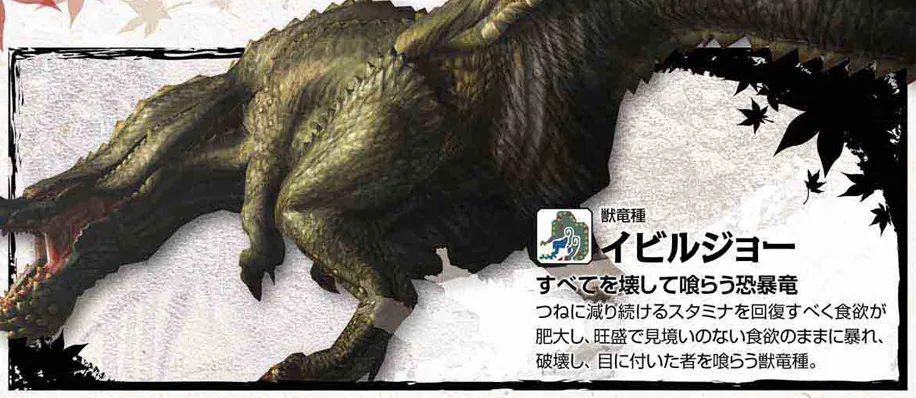
Also called the "fearsome tyrant wyvern." It keeps no territory and is always wandering in search of food. It is extremely violent, and when enraged its muscles swell and old scars rise to the surface. It has to keep eating to hold its high body heat and is said to sometimes drive the creatures around it to extinction.
Also called the "Fearsome Tyrant Wyvern". It has to keep eating to hold its high body heat, so it is always hunting for food.
モンスター&クエストデータ知識書 (Capcom, 2011), p. 26
Monster data
| Danger | ★★★★★★★★ |
|---|---|
| Base health | ★★★★★ |
| Size | Small 1844.01 or lessBig 2458.68 or moreKing 2622.59 or more |
| Stamina | Village ★★★★Gathering Hall ★★★★ |
| When enraged | Attack △△Defense -Speed △ |
| Ailments | Poison ◎Paralysis ○Sleep ○Stun △Exhaust ○ |
| Items | Flash Bomb ◎Sonic Bomb ×Pitfall Trap ◎Shock Trap ◎Meat ○Dung Bomb ○ |
| Carves | Body x4Tail x2 |
More stars means more danger and more health. Red stars mean health past the top of the five-star scale, or very high stamina. Under When enraged, △ is a rise (more △ for a bigger one), ▼ a drop, and - no change. Ailments and items run from ◎ (works well) through ○ and △ to × (works poorly), and - means no effect.
Breakable parts
- Head Deal enough damage to the head. The break has two stages: the first splits the jaw and the second scars the face.
- Tail Deal enough cutting damage to the tail.
Flinching and hitzones
| Part | Cut | Impact | Shot | Fire | Water | Ice | Thunder | Dragon | Stun |
|---|---|---|---|---|---|---|---|---|---|
| Head | ◎(○) | ◎(○) | ◎(○) | △(△) | △(△) | ×(△) | △(△) | △(△) | ○(○) |
| Chest | ◎(◎) | ○(◎) | ○(◎) | △(△) | △(△) | △(△) | ○(○) | ○(○) | -(-) |
| Torso | ○(△) | ○(△) | ○(△) | -(-) | -(-) | -(-) | ×(×) | -(×) | -(-) |
| Foreleg | ○(○) | ○(○) | ○(○) | △(△) | △(△) | -(-) | △(△) | △(△) | -(-) |
| Hind leg | ○(○) | ○(○) | ○(○) | ×(△) | ×(△) | -(-) | △(△) | △(△) | -(-) |
| Tail | ○(○) | ○(○) | ○(○) | -(-) | -(-) | -(-) | ×(×) | -(×) | -(-) |
| Part | Flinch |
|---|---|
| Head | △ |
| Chest | ◎ |
| Torso | ○ |
| Both forelegs | ○ |
| Right hind leg | ○ |
| Left hind leg | ○ |
| Tail | ○ |
Values in brackets are while enraged. A hitzone near ◎ takes damage well and one near × hardly at all, and - takes none. Stun is how easily impact attacks stun it there. Flinch runs from ◎ (flinches easily) to × (hardly ever).
Attacks
| Attack | Damage | Guard break | Stun | Stamina use |
|---|---|---|---|---|
| Sumo stomp | High | High | High | Mid |
| Tail attack | Mid | High | Mid | Mid |
| Bite left and right (first bite) | High | High | Mid | High |
| Body slam | High | High | Mid | Mid |
| Roar (large) | - | High | - | - |
| Turning bite | Mid | Mid | Mid | - |
| Dash bite when tired | High + Defense down | High | High | - |
| Dragon breath | High (Dragon) | High | - | High |
| Big spinning bite | High | High | High | Mid |
| Rock flick1 | Mid | High | Mid | Mid |
Brackets after the damage give its element or status. Damage is the health the hunter loses. Guard break is how hard the attack pushes through a guard, and stun is how much it builds toward stunning the hunter. Stamina use is what the attack costs the monster. The levels are Low, Mid, and High; - means none.
Materials
| How | Part | Material | Chance |
|---|---|---|---|
| Break reward | Head3 | Deviljho Tusk | ★★★★ |
| Head3 | Deviljho Skull | ★★★ | |
| Head3 | Deviljho Tusk x2 | ★★ | |
| Carve | Body | Deviljho Black Scale | ★★★ |
| Body | Deviljho Black Hide | ★★★ | |
| Body | Deviljho Hooked Claw | ★★ | |
| Body | Deviljho Tusk | ★★ | |
| Body | Deviljho Gem | ★ | |
| Tail | Deviljho Tail | ★★★★ | |
| Tail | Deviljho Black Scale | ★★★ | |
| Tail | Deviljho Gem | ★ | |
| Capture reward | Deviljho Skull | ★★★ | |
| Deviljho Black Hide | ★★★ | ||
| Deviljho Hooked Claw | ★★ | ||
| Deviljho Gem | ★ | ||
| Drop | Large Wyvern Tear | ★★★ | |
| Deviljho Hooked Claw | ★★★ | ||
| Wyvern Tear | ★★★ | ||
| Deviljho Gem | ★ |
| How | Part | Material | Chance |
|---|---|---|---|
| Break reward | Head3 | Deviljho Tusk | ★★★★ |
| Head3 | Deviljho Skull | ★★★ | |
| Head3 | Deviljho Tusk x2 | ★★ | |
| Carve | Body | Deviljho Black Scale | ★★★ |
| Body | Deviljho Black Hide | ★★★ | |
| Body | Deviljho Hooked Claw | ★★ | |
| Body | Deviljho Tusk | ★★ | |
| Body | Deviljho Gem | ★ | |
| Tail | Deviljho Tail | ★★★★ | |
| Tail | Deviljho Black Scale | ★★★ | |
| Tail | Deviljho Gem | ★ | |
| Capture reward | Deviljho Skull | ★★★ | |
| Deviljho Black Hide | ★★★ | ||
| Deviljho Hooked Claw | ★★ | ||
| Deviljho Gem | ★ | ||
| Drop | Large Wyvern Tear | ★★★ | |
| Deviljho Hooked Claw | ★★★ | ||
| Wyvern Tear | ★★★ | ||
| Deviljho Gem | ★ |
More stars means the material is easier to get. Red ★★★★★ marks one that is especially easy to get, and a red ★ one that is especially hard.
1 The rocks it throws differ by area, so a hit adds severe iceblight, severe fireblight, or severe waterblight
2 Materials only from the Village 6★ quest The One Who Devours the End
3 The head has to be broken through both stages to get the head break reward
Quests
Village
- Village 6-16 The One Who Devours the End
Gathering Hall, high rank
- Hall 7-15 Operation Jaggia Sweep
- Hall 7-23 Onward, Tundra Survey Team!
- Hall 7-29 Watch Your Step!
- Hall 8-32 Showdown at the Volcano