Duramborosドボルベルク
Brute Wyvern ・ 尾槌竜
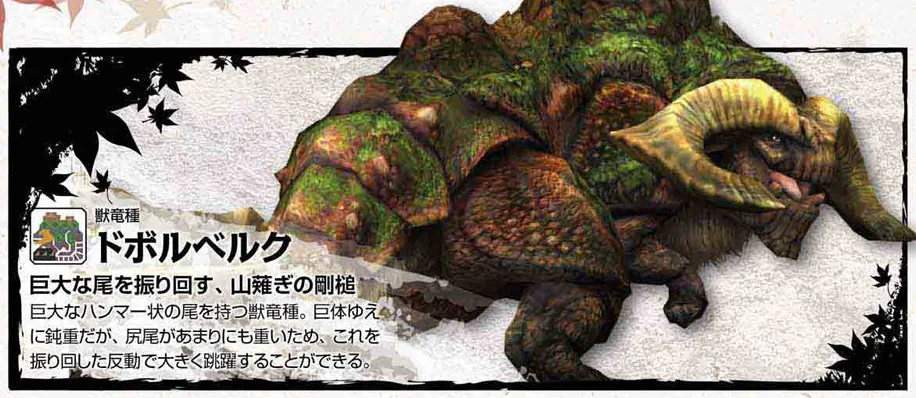
A Brute Wyvern with a tail that ends in a hammer-like lump, true to its name, the "tail hammer wyvern." It feeds on fallen and dead trees, and the huge tail also seems to be used to knock trees down. One theory holds that the humps on its back are an energy store.
A brute wyvern with a hammer-like lump on its tail. The hump on its back is thought to be its energy store.
モンスター&クエストデータ知識書 (Capcom, 2011), p. 64
Monster data
| Danger | ★★★★★★ |
|---|---|
| Base health | ★★★★★ |
| Size | Small 1880.28 or lessBig 2402.58 or moreKing 2569.72 or more |
| Stamina | Village ★★★★Gathering Hall ★★★★ |
| When enraged | Attack △△Defense △Speed △ |
| Ailments | Poison ◎Paralysis ○Sleep ◎Stun ○Exhaust △ |
| Items | Flash Bomb ◎Sonic Bomb ×Pitfall Trap ◎Shock Trap ◎Meat ×Dung Bomb ○ |
| Carves | Body x4Tail x1Mining x11 |
More stars means more danger and more health. Red stars mean health past the top of the five-star scale, or very high stamina. Under When enraged, △ is a rise (more △ for a bigger one), ▼ a drop, and - no change. Ailments and items run from ◎ (works well) through ○ and △ to × (works poorly), and - means no effect.
Breakable parts
- Hump Deal enough damage to the hump.
- Horn Deal enough damage to the head.
- Tail tip Deal enough damage to the tail tip. The break has two stages: the first cracks it and the second knocks the tip off.
Flinching and hitzones
| Part | Cut | Impact | Shot | Fire | Water | Ice | Thunder | Dragon | Stun |
|---|---|---|---|---|---|---|---|---|---|
| Head | ○(○) | △(△) | ○(○) | △(△) | ×(×) | ×(×) | △(△) | ×(×) | ○(○) |
| Horn | △(△) | △(△) | △(△) | ○(○) | △(△) | △(△) | ○(○) | -(-) | ◎(◎) |
| Torso | ○(○) | ○(○) | ○(○) | △(△) | ×(×) | △(△) | △(△) | △(△) | -(-) |
| Hump | ◎(◎) | ◎(◎) | ○(◎) | △(○) | ×(△) | △(△) | -(×) | △(△) | -(-) |
| Foreleg | ○(○) | ○(○) | ○(○) | △(△) | -(-) | △(△) | △(△) | △(△) | -(-) |
| Hind leg | ○(○) | ○(○) | ○(○) | △(△) | -(-) | △(△) | ×(×) | ×(×) | -(-) |
| Tail | ○(○) | ○(○) | ◎(◎) | △(△) | ×(×) | ×(×) | ×(×) | △(△) | -(-) |
| Tail tip | △(△) | ○(○) | ○(○) | △(△) | ×(×) | △(△) | ×(×) | △(△) | -(-) |
| Part | Flinch |
|---|---|
| Head | ○ |
| Torso | △ |
| Hump | △ |
| Foreleg | ○ |
| Right hind leg | ○ |
| Left hind leg | ○ |
| Tail | ○ |
| Tail tip | ○ |
Values in brackets are after the hump is broken. A hitzone near ◎ takes damage well and one near × hardly at all, and - takes none. Stun is how easily impact attacks stun it there. Flinch runs from ◎ (flinches easily) to × (hardly ever).
Attacks
| Attack | Damage | Guard break | Stun | Stamina use |
|---|---|---|---|---|
| Roar (large) | - | Mid | - | - |
| Charge (dash) | High | Mid | Mid | Mid |
| Horn swing combo | High | High | Mid | High |
| Tail slam combo | High | High | High | Mid |
| Big spin (stomp) | High | High | High | High |
| Tail slam | High | High | High | - |
| Tackle | Mid | High | Mid | Mid |
| Tail pull-out | Mid | Mid | Mid | - |
| Stomp (single) | High | High | High | High |
| Side jump (single) | High | High | High | Mid |
| Attack | Damage | Guard break | Stun | Stamina use |
|---|---|---|---|---|
| Tail slam into tail sweep (first half) | High | High | High | - |
| Tail slam into tail sweep (second half) | High | High | High | - |
Brackets after the damage give its element or status. Damage is the health the hunter loses. Guard break is how hard the attack pushes through a guard, and stun is how much it builds toward stunning the hunter. Stamina use is what the attack costs the monster. The levels are Low, Mid, and High; - means none.
Materials
| How | Part | Material | Chance |
|---|---|---|---|
| Break reward | Horn | Duramboros Horn | ★★★★★ |
| Horn | Duramboros Carapace | ★★★ | |
| Hump | Duramboros Hump | ★★★★ | |
| Hump | Duramboros Moss Shell | ★★★ | |
| Hump | Duramboros Carapace | ★★ | |
| Carve | Body | Duramboros Carapace | ★★★★ |
| Body | Duramboros Moss Shell | ★★★ | |
| Body | Duramboros Hump | ★★ | |
| Body | Duramboros Tailbone | ★ | |
| Tail | Duramboros Tail Shell | ★★★★★ | |
| Tail | Duramboros Carapace | ★★ | |
| Tail | Duramboros Tailbone | ★ | |
| Capture reward | Duramboros Moss Shell | ★★★ | |
| Duramboros Hump | ★★★ | ||
| Duramboros Carapace | ★★ | ||
| Duramboros Horn | ★★ | ||
| Duramboros Tailbone | ★ | ||
| Drop | Wyvern Tear | ★★★★★ | |
| Duramboros Moss Shell | ★★ | ||
| Duramboros Hump | ★ | ||
| Mining2 | Duramboros Tail Shell | ★★★★★ | |
| Duramboros Carapace | ★★ | ||
| Duramboros Tailbone | ★ |
| How | Part | Material | Chance |
|---|---|---|---|
| Break reward | Horn | Duramboros Horn+ | ★★★★★ |
| Horn | Duramboros Cortex | ★★ | |
| Horn | Duramboros Horn x2 | ★★ | |
| Hump | Duramboros Hump | ★★★ | |
| Hump | Duramboros Moss Shell+ | ★★★ | |
| Hump | Duramboros Hump x2 | ★★★ | |
| Hump | Duramboros Cortex | ★★ | |
| Carve | Body | Duramboros Cortex | ★★★★ |
| Body | Duramboros Moss Shell+ | ★★★ | |
| Body | Duramboros Hump | ★★ | |
| Body | Duramboros Carapace | ★ | |
| Body | Duramboros Tailbone | ★ | |
| Body | Duramboros Tailbone+ | ★ | |
| Tail | Duramboros Tail Shell+ | ★★★★★ | |
| Tail | Duramboros Cortex | ★★ | |
| Tail | Duramboros Tail Shell | ★ | |
| Tail | Duramboros Tailbone | ★ | |
| Tail | Duramboros Tailbone+ | ★ | |
| Capture reward | Duramboros Moss Shell+ | ★★★ | |
| Duramboros Cortex | ★★ | ||
| Duramboros Horn+ | ★★ | ||
| Duramboros Hump x2 | ★★ | ||
| Duramboros Moss Shell x2 | ★★ | ||
| Duramboros Tailbone | ★ | ||
| Duramboros Tailbone+ | ★ | ||
| Drop | Wyvern Tear | ★★★ | |
| Large Wyvern Tear | ★★★ | ||
| Duramboros Moss Shell+ | ★★ | ||
| Duramboros Hump | ★ | ||
| Mining2 | Duramboros Tail Shell+ | ★★★★★ | |
| Duramboros Cortex | ★★ | ||
| Duramboros Tailbone | ★ | ||
| Duramboros Tailbone+ | ★ | ||
| Duramboros Tail Shell | ★ |
More stars means the material is easier to get. Red ★★★★★ marks one that is especially easy to get, and a red ★ one that is especially hard.
1 After the first tail tip break, it can be mined only while the tail tip is stuck in the ground
2 While the tail is stuck in the ground
Quests
Gathering Hall, high rank
Drinks
- Drink 1 Mighty Hammer and Lightning Whirlwind
Training
- Drill 6 Duramboros Slaying Drill