Baleful Gigginoxギギネブラ亜種
Flying Wyvern ・ 電怪竜
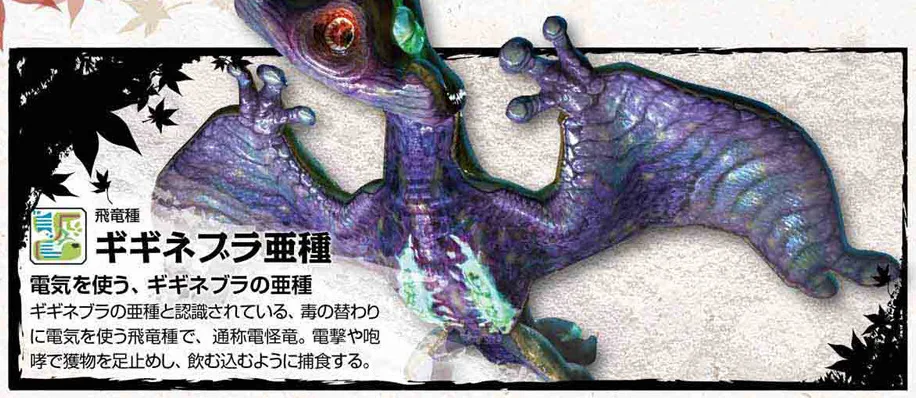
A subspecies of the electricity-wielding freak wyvern, thought to be a mutation and rarely reported. It is said to paralyze prey with powerful electric shocks before eating it. Breaking the electricity-storing organs on its skin should weaken the shocks. The Guild calls it the "electric freak wyvern."
A subspecies of Gigginox thought to be a mutation. It pins prey with strong electric shocks before eating it.
モンスター&クエストデータ知識書 (Capcom, 2011), p. 38
A Gigginox subspecies that uses electricity
A Flying Wyvern recognized as a subspecies of Gigginox that uses electricity instead of poison, commonly called the Electric Freak Wyvern. It pins prey in place with electric shocks and roars, then eats them as if swallowing them whole.
公式ガイドブック (Enterbrain, 2011), p. 366
How the guidebook says to hunt it
Use skills to guard against paralysis and thunderblight
A Gigginox subspecies that looks much like the normal species, but its weak element has changed from fire to water and it releases electric shocks from inside its body. The shocks inflict thunderblight (small or large) and paralysis, and if one hits you, you will likely be pinned in place and hit again. Until you are used to it, hunt with the Paralysis Negate or Thunder Res (L) skill active.
公式ガイドブック (Enterbrain, 2011), p. 368
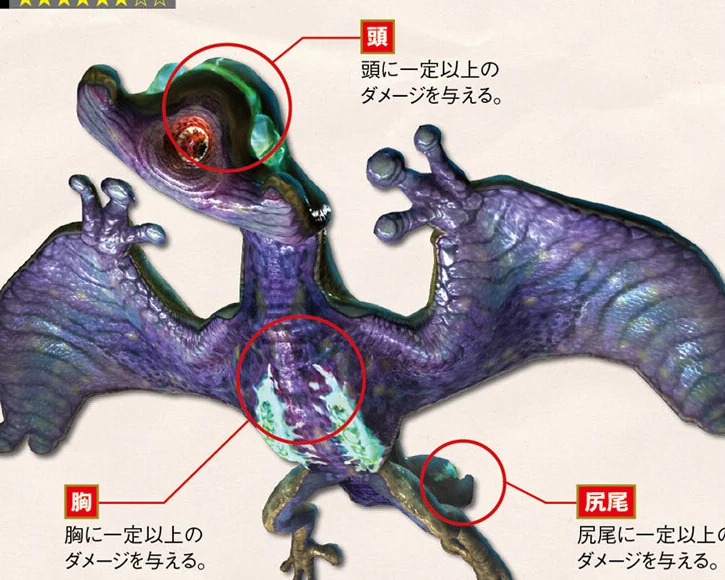
Tips
- Water element is effective
- It has attacks that cause paralysis and severe thunderblight, and a roar (large)
- Once its head is broken, its electric breath no longer paralyzes
- Once its chest is broken, its electric shock starts more slowly
- Once its tail is broken, its electric bombs take longer to explode
公式ガイドブック (Enterbrain, 2011), p. 368
Monster data
| Danger | ★★★★★★ |
|---|---|
| Base health | ★★★★ 4400 |
| Size | Small 1004.64 or lessBig 1212.12 or moreKing 1266.72 or more |
| Stamina | Village and low rank -High rank ★★★★★ |
| When enraged | Attack △△Defense -Speed △ |
| Ailments | Poison ◎ 200 +100 / 700Paralysis × 200 +120 / 800Sleep △ 240 +140 / 940Stun △ 180 +100 / 580Exhaust ○ 180 +100 / 580 |
| Items | Flash Bomb ×Sonic Bomb ×Pitfall Trap ◎Shock Trap ◎Meat ×Dung Bomb ○ |
| Carves | Body x3 |
Ailment numbers: build-up needed the first time, the increase after each one / the cap. - means it never takes hold.
More stars means more danger and more health. Red stars mean health past the top of the five-star scale, or very high stamina. Under When enraged, △ is a rise (more △ for a bigger one), ▼ a drop, and - no change. Ailments and items run from ◎ (works well) through ○ and △ to × (works poorly), and - means no effect.
Breakable parts
- Head Deal enough damage to the head.
- Chest Deal enough damage to the chest.
- Tail Deal enough damage to the tail.
Flinching and hitzones
| Part | Cut | Impact | Shot | Fire | Water | Ice | Thunder | Dragon | Stun |
|---|---|---|---|---|---|---|---|---|---|
| Head | ○(△) | ◎(△) | ◎(△) | ×(×) | ○(○) | -(-) | -(-) | △(△) | ○(○) |
| Neck | ○(△) | ○(○) | ○(△) | ×(×) | ○(○) | -(-) | -(-) | △(△) | -(-) |
| Back | ○(○) | ○(○) | ○(○) | ×(×) | △(△) | -(-) | -(-) | ×(×) | -(-) |
| Chest | ◎(◎) | ○(○) | ◎(◎) | ×(×) | ○(○) | -(-) | -(-) | △(△) | -(-) |
| Foreleg | ○(○) | ○(○) | △(△) | ×(×) | △(△) | -(-) | -(-) | ×(×) | -(-) |
| Hind leg | ○(○) | ○(○) | ○(○) | ×(×) | △(△) | -(-) | -(-) | △(△) | -(-) |
| Tail | △(◎) | △(◎) | △(◎) | ×(×) | ○(○) | -(-) | -(-) | △(△) | -(-) |
| Part | Cut | Impact | Shot | Fire | Water | Ice | Thunder | Dragon |
|---|---|---|---|---|---|---|---|---|
| Head | 45 (19) | 55 (19) | 50 (10) | 5 | 30 | 0 | 0 | 20 |
| Neck | 40 (24) | 40 (25) | 40 (15) | 5 | 25 | 0 | 0 | 10 |
| Back | 35 | 30 | 25 | 5 | 20 | 0 | 0 | 5 |
| Chest | 55 | 45 | 50 | 5 | 30 | 0 | 0 | 15 |
| Foreleg | 30 | 30 | 15 | 5 | 10 | 0 | 0 | 5 |
| Hind leg | 40 | 40 | 35 | 5 | 10 | 0 | 0 | 10 |
| Tail | 19 (50) | 19 (55) | 19 (50) | 5 | 30 | 0 | 0 | 10 |
| Part | Flinch |
|---|---|
| Head | ○ |
| Neck / Back | ○ |
| Chest | ○ |
| Right foreleg | ◎ |
| Left foreleg | ◎ |
| Right hind leg | ◎ |
| Left hind leg | ◎ |
| Tail | ○ |
Values in brackets are while enraged. A hitzone near ◎ takes damage well and one near × hardly at all, and - takes none. Stun is how easily impact attacks stun it there. Flinch runs from ◎ (flinches easily) to × (hardly ever). The second table gives the same hitzones as numbers out of 100. A number in brackets is for the other state.
Attacks
| Attack | Damage | Guard break | Stun | Stamina use |
|---|---|---|---|---|
| Stretching bite | Mid | High | Mid | Mid |
| Mad dash bite | Mid | High | High | Mid |
| Slam | Mid | High | High | Mid |
| Stretching tail swing | Mid | High | Mid | Mid |
| Electric shock | Mid (Thunder) + Paralysis, major Thunderblight | High | High | Mid |
| Electric bomb | High (Thunder) + Paralysis, major Thunderblight | High | High | Mid |
| Electric breath on the ground | Mid (Thunder) + Paralysis, minor Thunderblight | High | High | Mid |
| Back jump electric breath | Mid (Thunder) + Paralysis, minor Thunderblight | High | High | - |
| Electric breath on the ground (spread) | Mid (Thunder) + Paralysis, minor Thunderblight | Mid | High | Mid |
| Electric breath from the ceiling | Mid (Thunder) + Paralysis, minor Thunderblight | High | Mid | Mid |
Brackets after the damage give its element or status. Damage is the health the hunter loses. Guard break is how hard the attack pushes through a guard, and stun is how much it builds toward stunning the hunter. Stamina use is what the attack costs the monster. The levels are Low, Mid, and High; - means none.
Materials
| How | Part | Material | Chance |
|---|---|---|---|
| Break reward | Tail | Baleful Gigginox Hide+ | ★★★ |
| Tail | Electro Sac | ★★★ | |
| Tail | Eerie Hide+ | ★★★ | |
| Tail | Eerie Hide x2 | ★ | |
| Tail | Wyvern Gem | ★ | |
| Head | Baleful Gigginox Hide+ | ★★★ | |
| Head | Pale Extract x2 | ★★★ | |
| Head | Dreadful Maw | ★★★ | |
| Head | Eerie Hide+ | ★★ | |
| Chest | Baleful Gigginox Hide+ | ★★★ | |
| Chest | Pale Extract x2 | ★★★ | |
| Chest | Electro Sac | ★★★ | |
| Chest | Eerie Hide+ | ★★ | |
| Carve | Body | Baleful Gigginox Hide+ | ★★★ 38% |
| Body | Baleful Gigginox Claw+ | ★★ 20% | |
| Body | Pale Extract | ★★ 15% | |
| Body | Dreadful Maw | ★★ 10% | |
| Body | Electro Sac | ★★ 10% | |
| Body | Eerie Hide+ | ★ 7% | |
| Capture reward | Electro Sac | ★★★ | |
| Baleful Gigginox Claw+ | ★★★ | ||
| Eerie Hide+ | ★★ | ||
| Pale Extract x2 | ★★ | ||
| Dreadful Maw | ★ | ||
| Wyvern Gem | ★ | ||
| Drop | Wyvern Tear | ★★★ 38% | |
| Large Wyvern Tear | ★★★ 37% | ||
| Pale Extract | ★★ 17% | ||
| Dreadful Maw | ★ 8% |
More stars means the material is easier to get. These percentages are the game's own chances. Red ★★★★★ marks one that is especially easy to get, and a red ★ one that is especially hard.
Quests
Gathering Hall, high rank
Hunting grounds
Also on the quest board in
Zones it moves through
| Ground | Zones it moves to |
|---|---|
| Tundra | 2, 3, 4, 5, 7 |
| Arena | 1 |
Drop: Drops one when its chest breaks. At most 1 per quest.
胸部位破壊時にひとつ落とす。
The maps page pins these zones on the game's own map.
モンスター&クエストデータ知識書 (Capcom, 2011), pp. 185-187