Bulldromeドスファンゴ
Fanged Beast ・ 大猪
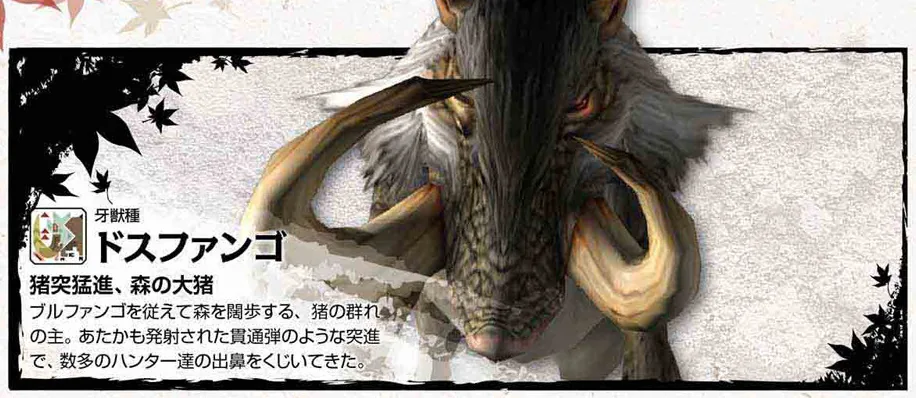
A large wild boar that leads the Bullfango, known for its big build and huge tusks. It is more aggressive than a Bullfango. It attacks mostly by charging, but it is very good at finding its targets. White hair grows on its face like a beard.
The large leader of the Bullfango, with huge tusks. It mostly charges, but it is good at finding its targets.
モンスター&クエストデータ知識書 (Capcom, 2011), p. 60
Headlong charge, the great boar of the forest
The lord of the boar herd, striding through the forest with Bullfango at its side. Its charge, like a fired Pierce shot, has stopped many hunters before they could get going.
公式ガイドブック (Enterbrain, 2011), p. 426
The large, big-tusked leader of the Bullfango. It attacks mostly by charging, but it is very good at finding enemies.
オフィシャルハンターズガイド (Capcom, 2011), p. 74
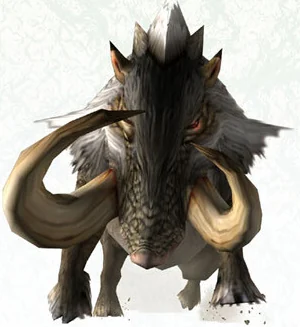
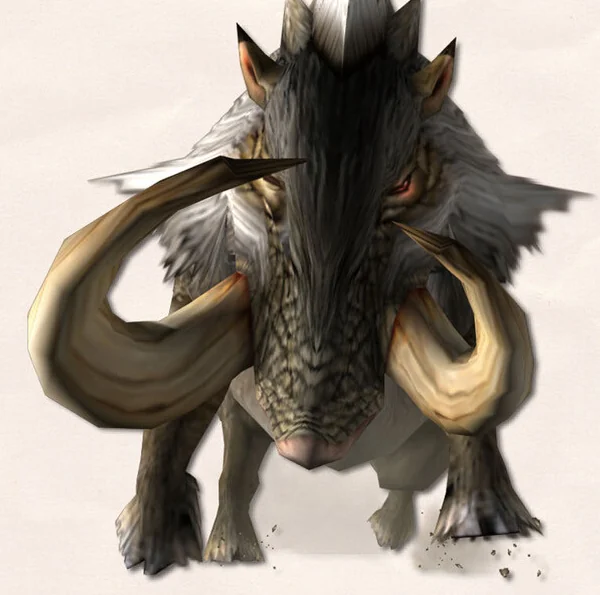
The Charging Boar猛進の大猪
Bulldrome, the great boar that has brought countless rookie hunters to tears, has appeared in the Misty Peaks. Its wild temper and headlong charges are the same wherever it goes...
数多くのルーキーハンターを泣かせてきた大猪ドスファンゴが渓流に現われた。荒い気性と猪突猛進ぶりはどこへ行っても変わることなく…。
Movie notes from the gallery in the game
How the guidebook says to hunt it
Dodge the charge and attack from behind
It charges fast and in straight lines all the time, so dodge and hit it from behind. Bulldrome goes from locking onto a target to attacking very quickly, and getting greedy with hits earns a painful blow, so do not chase too far. Bulldrome also tires easily, so it is fine to focus on dodging its charges and then pile on attacks once it is exhausted. In High Rank Guild Hall quests it uses a long distance charge that tracks the player. Do not force attacks; concentrate on dodging.
公式ガイドブック (Enterbrain, 2011), p. 427
Monster data
| Danger | ★★★ |
|---|---|
| Base health | ★ 1800 |
| Size | Small 513.36 or lessBig 655.96 or moreKing 701.59 or more |
| Stamina | Village and low rank ★★★★High rank ★★★★★ |
| When enraged | Attack △Defense -Speed △ |
| Ailments | Poison ○ 30 +100 / 330Paralysis ◎ 30 +100 / 330Sleep ◎ 150 +100 / 350Stun ◎ 100 +150 / 400Exhaust ◎ 150 +50 / 350 |
| Items | Flash Bomb ×Sonic Bomb ×Pitfall Trap ◎Shock Trap ◎Meat ×Dung Bomb ○ |
| Carves | Body x3 |
Ailment numbers: build-up needed the first time, the increase after each one / the cap. - means it never takes hold.
More stars means more danger and more health. Red stars mean health past the top of the five-star scale, or very high stamina. Under When enraged, △ is a rise (more △ for a bigger one), ▼ a drop, and - no change. Ailments and items run from ◎ (works well) through ○ and △ to × (works poorly), and - means no effect.
Flinching and hitzones
| Part | Cut | Impact | Shot | Fire | Water | Ice | Thunder | Dragon | Stun |
|---|---|---|---|---|---|---|---|---|---|
| Head | ◎ | ◎ | ◎ | △ | △ | × | ○ | - | ○ |
| Body | ◎ | ◎ | ◎ | △ | × | - | △ | - | - |
| Part | Cut | Impact | Shot | Fire | Water | Ice | Thunder | Dragon |
|---|---|---|---|---|---|---|---|---|
| Head | 80 | 70 | 70 | 20 | 10 | 5 | 30 | 0 |
| Body | 70 | 60 | 60 | 10 | 5 | 0 | 20 | 0 |
| Part | Flinch |
|---|---|
| Whole body | ◎ |
A hitzone near ◎ takes damage well and one near × hardly at all, and - takes none. Stun is how easily impact attacks stun it there. Flinch runs from ◎ (flinches easily) to × (hardly ever). The second table gives the same hitzones as numbers out of 100.
Attacks
| Attack | Damage | Guard break | Stun | Stamina use |
|---|---|---|---|---|
| Charge (weak) | Mid | Mid | Low | High |
| Charge (strong) | Mid | Mid | Low | High |
| Headbutt | Mid | Mid | Low | High |
| Spinning fang attack | Mid | Mid | Low | High |
| Attack | Damage | Guard break | Stun | Stamina use |
|---|---|---|---|---|
| Long homing charge | Mid | Mid | Low | High |
Brackets after the damage give its element or status. Damage is the health the hunter loses. Guard break is how hard the attack pushes through a guard, and stun is how much it builds toward stunning the hunter. Stamina use is what the attack costs the monster. The levels are Low, Mid, and High; - means none.
Materials
| How | Part | Material | Chance |
|---|---|---|---|
| Carve | Body | Bulldrome Hide | ★★★★ 50% |
| Body | Brute Bone | ★★★ 30% | |
| Body | Bulldrome Tusk | ★★ 15% | |
| Body | Bullfango Head | ★ 5% | |
| Capture reward | Bulldrome Hide | ★★★★ | |
| Brute Bone x2 | ★★★ | ||
| Bullfango Head | ★★ | ||
| Bulldrome Tusk | ★ | ||
| Drop | Fanged Beast Tear | ★★★★★ 75% | |
| Bulldrome Hide | ★★ 20% | ||
| Bulldrome Tusk | ★ 5% |
| How | Part | Material | Chance |
|---|---|---|---|
| Carve | Body | Bulldrome Hide+ | ★★★ 40% |
| Body | Jumbo Bone | ★★★ 25% | |
| Body | Bulldrome Tusk | ★★ 17% | |
| Body | Bulldrome Hide | ★★ 10% | |
| Body | Bullfango Head | ★ 8% | |
| Capture reward | Bulldrome Hide+ | ★★★★ | |
| Jumbo Bone x2 | ★★★ | ||
| Bullfango Head | ★★ | ||
| Drop | Fanged Beast Tear | ★★★ 38% | |
| Large Fanged Beast Tear | ★★★ 37% | ||
| Bulldrome Hide+ | ★★ 20% | ||
| Bulldrome Tusk | ★ 5% |
More stars means the material is easier to get. These percentages are the game's own chances.
Quests
Village
- Village 2-9 The Gargwa That Lays Lucky Eggs
- Village 2-18 What Good Medicine Needs
- Village 3-4 Stampede Carnival!
- Village 3-18 The Sleepy Blue Pack
- Village 5-14 In the Arms of the Snow
Gathering Hall, low rank
- Hall 1-9 Mushroom Feast
- Hall 2-1 Stampede Carnival!
- Hall 2-12 Mining in the Freezing Cold
- Hall 5-17 What Lives in the Forest
- Hall 5-21 The Gathered Strong
Gathering Hall, high rank
Drinks
- Drink 14 Bulldrome in the Courtyard
Hunting grounds
Zones it moves through
| Ground | Zones it moves to |
|---|---|
| Misty Peaks | 2, 4, 5, 6, 7 |
| Flooded Forest | 3, 4, 5, 6, 8 |
| Tundra | 2, 3, 5, 7 |
| Small Arena | 1 |
Drop: Sometimes drops one when knocked down. At most 1 per quest.
ダウンさせたときに一定の確率でひとつ落とす。
The maps page pins these zones on the game's own map.
モンスター&クエストデータ知識書 (Capcom, 2011), pp. 185-187