Great Jaggiドスジャギィ
Bird Wyvern ・ 狗竜
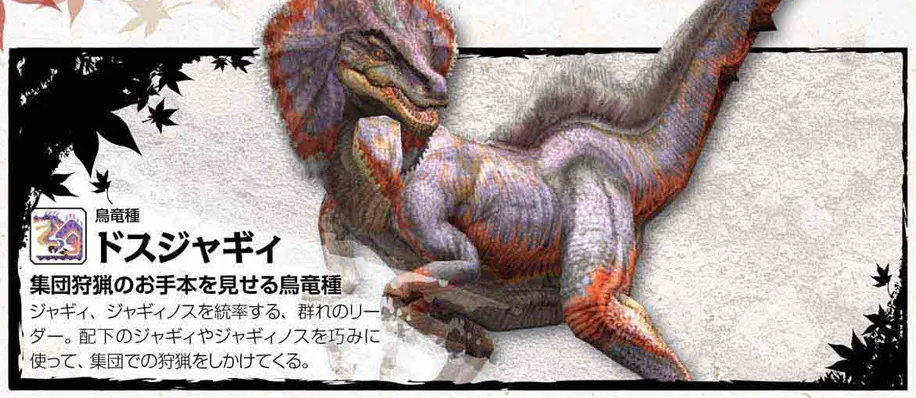
The leader of a Jaggi pack. Males normally leave the pack once they reach a certain size and live alone. Later they return, and only the very few who win the fight for it take this place. The leader keeps tight control of the pack and is said to give complex orders with its calls.
The leader of a Jaggi pack. It is said to give the pack complex orders with its calls.
モンスター&クエストデータ知識書 (Capcom, 2011), p. 56
A bird wyvern that shows how pack hunting is done
The leader of the pack, in command of Jaggi and Jaggia. It makes skillful use of the Jaggi and Jaggia under it to hunt as a group.
公式ガイドブック (Enterbrain, 2011), p. 422
The leader of a Jaggi pack. It keeps tight control of the pack and is said to give orders with its cries.
オフィシャルハンターズガイド (Capcom, 2011), p. 72
Leader of the Pack群れの長
Great Jaggi, leader of the pack. It leads Jaggi and hunts as a group. Its cries are said to call its underlings and even direct their attacks.
群れの長ドスジャギィ。ジャギィを従え集団で狩りを行う。その鳴き声は子分を呼び寄せ、攻撃指示まで行うと言われている。
Movie notes from the gallery in the game
How the guidebook says to hunt it
Watch for teamwork from the whole pack
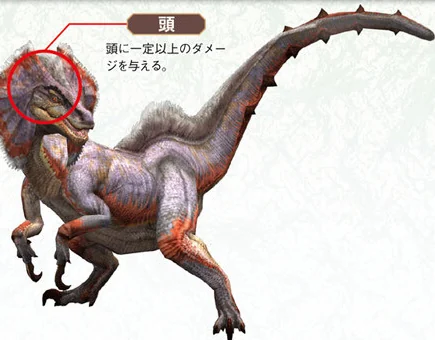
Great Jaggi leads packs of Jaggi and Jaggia. When all three kinds are in the same area, they work as a team, ganging up on one target or attacking as a whole pack. Attack Great Jaggi from its right side, where its spinning tail attack is easier to dodge. Great Jaggi recovers health when it moves to another area, so follow it quickly and keep the hunt short.
公式ガイドブック (Enterbrain, 2011), p. 423
Monster data
| Danger | ★★★ |
|---|---|
| Base health | ★★ 2000 |
| Size | Small 840.87 or lessBig 1074.45 or moreKing 1149.19 or more |
| Stamina | Village and low rank ★★★★High rank ★★★★★ |
| When enraged | Attack △Defense -Speed △ |
| Ailments | Poison △ 90 +30 / 300Paralysis ◎ 150 +15 / 210Sleep ◎ 150 +20 / 230Stun ◎ 120 +30 / 240Exhaust ◎ 150 +50 / 350 |
| Items | Flash Bomb ◎Sonic Bomb ×Pitfall Trap ◎Shock Trap ◎Meat ○Dung Bomb ○ |
| Carves | Body x3 |
Ailment numbers: build-up needed the first time, the increase after each one / the cap. - means it never takes hold.
More stars means more danger and more health. Red stars mean health past the top of the five-star scale, or very high stamina. Under When enraged, △ is a rise (more △ for a bigger one), ▼ a drop, and - no change. Ailments and items run from ◎ (works well) through ○ and △ to × (works poorly), and - means no effect.
Breakable parts
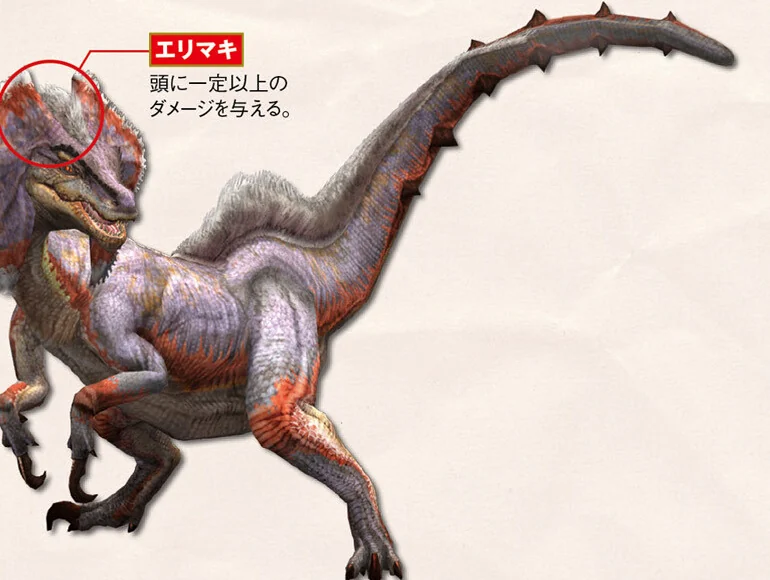
- Frill Deal enough damage to the head.
Flinching and hitzones
| Part | Cut | Impact | Shot | Fire | Water | Ice | Thunder | Dragon | Stun |
|---|---|---|---|---|---|---|---|---|---|
| Head | ◎ | ◎ | ◎ | ○ | △ | △ | △ | × | ○ |
| Body | ◎ | ◎ | ◎ | ○ | △ | △ | △ | × | - |
| Part | Cut | Impact | Shot | Fire | Water | Ice | Thunder | Dragon |
|---|---|---|---|---|---|---|---|---|
| Head | 85 | 85 | 65 | 30 | 20 | 20 | 20 | 5 |
| Body | 65 | 63 | 58 | 30 | 20 | 20 | 20 | 5 |
| Part | Flinch |
|---|---|
| Head | ◎ |
| Body | ◎ |
A hitzone near ◎ takes damage well and one near × hardly at all, and - takes none. Stun is how easily impact attacks stun it there. Flinch runs from ◎ (flinches easily) to × (hardly ever). The second table gives the same hitzones as numbers out of 100.
Attacks
| Attack | Damage | Guard break | Stun | Stamina use |
|---|---|---|---|---|
| Tail spin | Low | Mid | Mid | - |
| Turning bite | Low | Low | Low | - |
| Bite combo (first bite) | Low | Low | Low | - |
| Bite combo (second bite) | Mid | Mid | Mid | High |
| Body slam (body) | Mid | High | Mid | High |
| Body slam (head) | Mid | High | Mid | High |
Brackets after the damage give its element or status. Damage is the health the hunter loses. Guard break is how hard the attack pushes through a guard, and stun is how much it builds toward stunning the hunter. Stamina use is what the attack costs the monster. The levels are Low, Mid, and High; - means none.
Materials
| How | Part | Material | Chance |
|---|---|---|---|
| Break reward | Frill | King's Frill | ★★★★ |
| Frill | Screamer Sac | ★★★ | |
| Frill | Great Jaggi Head | ★★ | |
| Carve | Body | Great Jaggi Hide | ★★★★ 43% |
| Body | Great Jaggi Claw | ★★★ 30% | |
| Body | Screamer Sac | ★★ 19% | |
| Body | Jaggi Scale | ★ 8% | |
| Capture reward | Screamer Sac x2 | ★★★★ | |
| Great Jaggi Claw | ★★★ | ||
| Great Jaggi Hide | ★★ | ||
| Great Jaggi Head | ★ | ||
| Drop | Wyvern Tear | ★★★★★ 75% | |
| Jaggi Scale | ★★★ 25% |
| How | Part | Material | Chance |
|---|---|---|---|
| Break reward | Frill | King's Frill | ★★★★★ |
| Frill | Great Jaggi Head | ★★ | |
| Frill | Bird Wyvern Gem | ★★ | |
| Frill | Screamer Sac x2 | ★ | |
| Carve | Body | Great Jaggi Hide+ | ★★★ 40% |
| Body | Great Jaggi Claw+ | ★★★ 28% | |
| Body | Screamer Sac | ★★ 17% | |
| Body | Great Jaggi Hide | ★ 8% | |
| Body | Great Jaggi Claw | ★ 7% | |
| Capture reward | Screamer Sac x2 | ★★★★ | |
| Great Jaggi Claw+ | ★★★ | ||
| Great Jaggi Hide+ | ★★ | ||
| Great Jaggi Head | ★ | ||
| Bird Wyvern Gem | ★ | ||
| Drop | Wyvern Tear | ★★★★ 50% | |
| Large Wyvern Tear | ★★★ 25% | ||
| Great Jaggi Hide+ | ★★★ 23% | ||
| Bird Wyvern Gem | ★ 2% |
More stars means the material is easier to get. These percentages are the game's own chances. Red ★★★★★ marks one that is especially easy to get, and a red ★ one that is especially hard.
Quests
Village
- Village 2-8 Jaggia in the Misty Peaks
- Village 2-13 Ancient Romance? Dragonbone Crystals!
- Village 3-7 Rowdy Rhenoplos
- Village 3-15 A Future Riding on Mushrooms
Gathering Hall, low rank
- Hall 1-5 Jaggi of the Sandy Plains
- Hall 1-6 Ancient Romance? Dragonbone Crystals!
- Hall 2-2 Jaggia in the Misty Peaks
- Hall 3-5 Operation Jaggi in the Peaks
- Hall 3-9 Rowdy Rhenoplos
- Hall 3-10 A Delicacy That Swims the Sand?!
- Hall 3-18 A Henpecked Life Is No Picnic
- Hall 5-19 The Island Forest
Gathering Hall, high rank
- Hall 6-4 Deserted Island Gathering Tour
- Hall 6-7 Operation Jaggi in the Peaks
- Hall 6-10 Barroth, the Mud Wyvern!
- Hall 7-8 A Sand Barioth Twister in the Plains
- Hall 7-12 Hunting Queen Rathian
- Hall 8-28 Tension in the Peaks
Drinks
- Drink 3 In the Bird Wyvern Cage
Hunting grounds
Misty PeaksSandy PlainsDeserted Island
Also on the quest board in
Zones it moves through
| Ground | Zones it moves to |
|---|---|
| Misty Peaks | 2, 4, 6, 7, 8, 9 |
| Sandy Plains | 1, 2, 3, 4, 5, 7, 8, 9 |
| Deserted Island | 1, 2, 3, 5, 6, 7 |
| Small Arena | 1 |
Drop: Sometimes drops one when, weakened, it runs off into a hole. At most 1 per quest.
弱ってから移動して穴に逃げ込むときに一定の確率でひとつ落とす。
The maps page pins these zones on the game's own map.
モンスター&クエストデータ知識書 (Capcom, 2011), pp. 185-187